Monday, August 13, 2007

Borrowed scraper returned


A few days following the post "twenty years of scrapers" I received a call from a old friend from Atlanta who pointed out I had not included my fabricated Stanley 85/87 scraper in the post. I replied I had not included it because I could not find the piece and assumed it had been misplaced in the big move from Atlanta to the north Georgia mountains. He informed me that I had loaned it to him after he was admiring the simple construction involved in converting an incomplete plane and a five dollar flea market Stanley 80 into a neat scraper plane. Looking for an excuse to get out of the dirty air and heavy Atlanta traffic he offered to drive it up and buy my lunch ....what a deal. After lunch we sharpened the blade and made a few shavings with the scraper plane and it was then I recalled the excitement I felt when first using the tool.
When I made this tool I had two or three Stanley 80 scrapers in the shop . I was building pool tables at that time and was using the Stanley 80 to scrape down the mother of pearl inlaid diamonds on the rosewood rails. I had only tried a Stanley112 scraper once and the feel of a fixed scraper blade installed in a plane body that had a handle and front knob provided a level of control I liked better than a spokeshave or rams head handle configuration. I decided to fabricate a poor mans 85 using an old Stanley #3 body and an extra Stanley 80.
The first step was to take one of the extra Stanley 80's and perform a lobotomy on the center of the casting.Cutting cast iron with a new hacksaw blade was relative easy. I made the initial cuts wide and dressed up the removed section on a belt sander. Next I drilled and elongated the two holes for the frog screws. An 1/8 inch thick piece of flat brass stock was used to secure the blade similar to the bar on the Stanley 80.

The blade was shaped like the blade on the 85 to accommodate the frog retaining bar but extend the width of the blade to the sides of the plane body.

By cutting out the center section of the Stanley 80 the adjusting screw would still be available for bowing the blade with the blade centered in the throat opening. More on this later.

The new frog that would hold the scraper blade would not extend forward enough to use the existing "original"throat. This required cutting a new throat into the plane body to receive the scraper blade. After careful measurement I scribed a line across the bottom of the plane where I wanted the blade to extend through the bed. After scribing a line I drilled several 1/8 inch holes across the scribed line and using a coping saw and file cleaned the new throat opening. The new throat was made to extend across the width of the bed to achieve the dado effect.

The Stanley 85 and 87 scraper planes were unique in the way the blade was installed in the throat opening. But first let's back up a minute and discuss the blade that was used in the original Stanley 85/87 scraper planes. Because this plane was made to be a light weight "finesse scraper" the stock blade thickness was around .030 , much thinner than the stock blades for the 12--112-- 212 series of scrapers.
The blade was installed with the blade touching the front of the throat opening. With the blade set to provide a light scraping action, once the blade was locked there was a small screw located to the rear and centered between the two frog retaining screws, this screw was adjusted to provide a small pivot of the frog which would increase or decrease the depth of cut.
On My fabricated scraper I decided not to install this fine pitch adjusting screw because I had the thumbscrew from the original Stanley 80 as part of my frog.
With the blade set against the front of the throat as you would push the body forward to take a cut the burr would start its cutting and the forward pressure working against the cutting action would cause the thin blade to bow thus providing an opening for the shavings to escape. This prevented shavings from falling through the throat opening and becoming victims of "shaving road kill".
Once one becomes proficient at setting the blade against the front of the throat and feeling the blade bite and spring back you can back the blade away from the throat and position it in the middle of the throat opening. With the blade set in the center the scraper will still perform but not as "sweet" as set the way the scraper was intended to operate. The blade can also be backed against the rear of the throat , in this position the cutting action becomes very rigid with increased blade chatter.It's like swapping your nice springy leaf rake for a short toothed garden rake.

Showing blade set for best "finesse" scraping feel and results.

With the fabricated version I did not include the fine tilt adjusting setscrew but could regulate the cutting depth by turning the bow thumbscrew as done with a Stanley 80. Overall the conversion made a very usable scraper and it quickly became my favorite for scraping down the mother of pearl inlays flush with the rail wood on the pool tables.

Regardless of the type of scraper plane one uses if the blade is not properly prepared and sharpened you will easily become frustrated and not become proficient in making the tool talk to you. If you have mastered the blade sharpening and installation you know what I am speaking of when I say "talk to you". In a later post I will try and share my experiences on preparing and sharpening a scraper blade for use in a scraper plane. There have been numerous articles written on sharpening card scrapers but maybe the woodworking community could stand one more as it relates to scraper blades used in scraper planes.

Monday, August 6, 2007

Chair scrapes and beaders

This is a group of chair scrapers I made over the years. The one in the front was the only one I did in quantity, they were made of cocobolo and had the locking screws coming from the rear into the front brass blade retainer and sole.These chair scrapes usually perform best with a .010 to .015 thick blade. I remember doing a scraper demonstration for a woodworkers club in Raleigh ,NC one year and with this chair scrape I drew it down the edge of a piece of curly maple, The shaving shot out of the throat opening vertical for about 5 inches before falling forward. An elderly gentleman at the rear of the room sprang up from his seat and yelled "can you do that again". I did.


Not being able to afford the overpriced Stanley 69 beader I copied one from an original a customer brought into the shop for repair. About 100 were cast in silicone bronze with cocobolo handles. This was a sterling casting hand engraved with ebony handle. I keep it ,the wife said she liked it.


Three stringing routers or scratch stock tools used for beading or grooving the stock to receive a thin boxwood inlay.
The front one is my design patterned after a large panel gauge. I wanted a larger head for stability in longer stock. The middle one was an English slitting gauge with a modified cutter to enable you to use it across the grain instead of with the grain.
Rear is a Stanley marking gauge modified to secure an inlay scratch blade or a beading blade.,


Close up of scratch blade for doing inlays. Blade was made from a piece of scraper blade or saw blade ,sharpened slowly ,tested to ensure the groove scratched would receive the inlay with a snug fit before gluing.


Close up of cutter installed in the English slitting gauge. It has two knife blades followed by a small scraper . When using the tool you roll the stem allowing the two knife blades to score the wood and the small scraper pulls the stock out without any tear out. It is a little tricky until you develop a feel for the rocking motion. Operation is similar to a dado plane with nickers.

Twenty five years of scrapers


Last week I hosted a meeting for a few local woodworkers at my shop.Everyone was anxious to test drive the new scraper insert I am in the process of manufacturing. As I was dragging out old tools to show how the scraper insert had evolved over the years it was a trip down memory lane. Someone suggested this would be an interesting post to show a little history of my tool making over the last 25 years. So here we go...hope you enjoy.

The bench was covered with scrapers,each had an interesting story,some of success and others....hey Rome wasn't built in a day. Most of the early tools were made with little or no metal working tools and no experience with casting. You can watch the evolution as more metalworking tools and casting equipment were added to the shop.


This was the first scraper I made. It was meant to be a longer version of a Stanley 112 with the blade adjustment like the Stanley 80. The 1/4 inch bolt behind the blade was used to bow the blade for an increased cut. The scraper worked but lacked the weight and mass to be effective. Note adjustment mechanism on the
Stanley 112 in background.


This was my first attempt at a metal scraper. It was a cut and paste from an old Shelton smoothing plane. With no casting equipment the brass frog and lever cap were fabricated out of brass stock. The frog was spring loaded with two springs and the long screw in front of the handle was used to adjust the stop of the frog thus changing the attack angle of the blade. It worked OK but needed some refinement.


You do not usually think of a beader or scratch stock as a scraper but the cutter is a small scraper blade usually profiled or shaped for a special beading or inlay function. This was a special scraper made from an early style Stanley #3 smoother plane. The frog was made from aluminum angle stock bent to set the blade at roughly 80 degrees. You could install a thin scraper blade in the frog and use as a scraper or (as shown) install a beading cutter. With the installed side rod holding a fence from a Stanley 78 the plane was very useful as a beading tool and the handle and front knob provided a level of control not available with a Stanley beader.


Bottom view showing a beading cutter installed and the fence.


This scraper was my version of the poor mans 212. The going price was about $1200.00 for a Stanley 212 and Lie Nielsen
had not started producing the reproduction yet. I took an junk Stanley #2 , removed the frog and installed a piece of scrap iron found in a junk pile to where the frog had been attached . A hole was drilled to receive the adjustment rod . This prototype had two first in my toolmaking journey. First the frog and lever cap were investment cast from a wax pattern,second this was the first time I had used the spring to replace the front locking nut. This improvement was so effective I immediately converted every Stanley 12 and 212 scraper in the shop to this format.


The prototype 212 was so successful I made a pattern for sand casting using an original Stanley 212 for measurements. I had several hundred cast in ductile iron and later a few hundred cast in silicone bronze.These scrapers show up occasional at flea markets and auctions,the letters HT were cast into the body to enable one to distinguish it from an original Stanley 212.About half the sales were to collectors and
the others were bought by woodworkers like myself who could not afford the big bucks for a great user.


Almost all the scrapers sold to users were ordered with the modified spring adjuster.


Prototype of my patented scraper insert that was sold to Lee Valley. The prototype worked.


Lee Valleys production model.


I first made the "Jointer Scraper" about ten years ago using parts of a door hinge and some junk yard hardware.The plane body was a Craftsman #7 size jointer. The length of the scraper,patented spring blade adjustment,and the extra weight proved to be a winner. The scraper stayed loaned out more than in the shop for my own use. Everyone who saw it wanted one for their use. Because of the time to convert a plane and that it involved drilling and fitting a pin in the base casting it was not a good candidate to mass produce. The plane was loaned out several times to woodworkers who wanted to try and convert one of their extra planes. The problem was no one ever converted one and when I needed the plane I had to do a recall.One night while drinking some really bad Canadian beer I had the idea of how to make the insert without having to modify the plane.


Insert installed in a Stanley 607.


Insert installed on a late model Stanley #7 and a Lie Nielsen.
For a recent product review HERE


Butterboard models and waxes sprued up ready to invest and cast.


Miniature scrapers,the small chair scrape up front is 14K gold. Who do you think owns this one me or my wife.


Friday, July 27, 2007

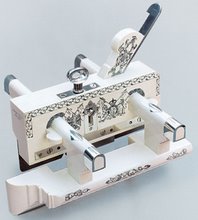
The Evolution of the " Slipper Plane "


Most investment cast miniatures I have made over the years start with making the model.Sometimes the model is made from blocks of wax,delrin,wood,or brass. Material selection is driven by the different challenges or features the model must have. After the model is made the next step is making an RTV (room temperature vulcanizing ) mold. The mold is injected with hot wax to produce multiple wax patterns that will be invested and cast with bronze, silver or gold.
The process I chose for the "slipper plane" was similar with a few changes, most changes were a result of not being satisfied with the design and wanting to tweak or change it along the way.
The above RTV mold was made from an original antique Meriden patent plane. The feature of this plane I was attracted to was the cam blade locking and positing lever. I do not have a current photo of the japanned cast iron original,one can be seen in Roger Smiths book PT&MP volume 2 page 149. Also Google patent number 282,468.
Although the antique plane was "cute" I wanted to keep the cam feature but enhance the design of the planes side profile and give it a custom or modern design.
The above photo shows a wax injection from the RTV mold. This wax was invested and cast in silicone bronze. The next photo is the assembled bronze casting from one of the waxes.

The first step was to take one of the original waxes and modify it to the new profile as shown in the following picture. The sides were added by doing a cut and melt using a special flexible wax. The red and yellow waxes are main sprues and feeder sprues used to evacuate the wax during wax burnout and also serve as feeder lines when pouring the molted metal into the heated and cured investment.(think of investment as a fine sand similar to plaster of Paris.
The next shot is the casting from the first "attempt".
The first modification was close to what I was looking for but It was "no Cigar".
Because the first modified wax was lost (lost wax casting) the new attempt was like starting from scratch. Using another original wax it was cut and melt time again to form the new design. The next two pictures show the second attempt wax model and casting.

The second attempt looked a little better but needed a little more pizazz. The casting was then hand engraved with a deep relief to provide the required depth in the finished casting.
A final mold was made from the engraved model. The next picture shows a casting of the plane in silicone bronze. Notice the additional material that was added to the base of the casting,this was done to provide additional metal to allow for sanding the plane bottom without getting it too thin. The pink wax next to the casting shows the additional stock that was added. After casting and grinding the overhang of this extra stock I decided it was too much trouble to clean the overhang off .The next castings which were done in red brass the overhang was left which gave the appearance of a sole on ones shoe.After showing this version to a friend ,who is a model maker and has a good eye for design and proportions, he made the comment "it looks like a slipper". This was how the plane received its name and it has stuck.
That's my story and I am sticking to it.
At this point it was time for production to begin. Following shots show a group of final waxes and a view of what the red brass castings look like before pickling the castings and final polishing. The last two shots show the completed project.I started delivery last week and have sold out the first production run, I'll be casting another larger batch next week. If you have any questions or comments I will try and answer. hamlertools@alltel.net
Paul


Hand engraved 01 tool steel blade.

Sunday, July 22, 2007

Fixture for engraving ferrules


I was railroaded into doing a simple engraving job for a friend. Well you know how those simple jobs turn out sometimes... this one did.I used the 4th axis CNC mill with a spring loaded carbide scribe to scratch the artwork on the rings.

Because of the small diameter (.625) of the parts I was spending more time trying to rotate the part and reposition it to keep the area to be engraved located at 12 o'clock . Every time I loosened the jaws on the engraving vise the part would usually fall down between the jaws and require reinstalling it in the vise.


I fabricated a holder to go into the engraving vise to keep the rings from falling and to provide an easier mouse trap to better rotate the ring as required while engraving. The first step was to drill one hole in the face of each of the 2 engraving vise jaws (very soft) . I used the same size hole as those on the top of the jaws (factory drilled).


The pictures show two holding adapters ,one is for rings or ferrules that have one end capped with a small hole that the scribe or cutting tool goes through ,the other holder is for normal rings. The pictures show both style holders being put into the vise and shots showing the vise closed. The beauty of this fixture is all it takes is a small loosing of the vise to enable you to rotate the ring to the new position to be engraved. A few different holders could be made to handle a wide inside ring diameter and if the 2 holes drilled in the jaws that support the rod were properly registered it would accommodate some gun cylinders.


Another thing that made the operation easier was to remove the captive retainer from the vise tightening screw (the one that keeps the vise jaws centered). This enables you to slide both jaws at the same time and position the ring under the microscope center.