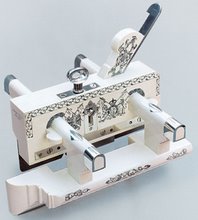
A few days following the post "twenty years of scrapers" I received a call from a old friend from Atlanta who pointed out I had not included my fabricated Stanley 85/87 scraper in the post. I replied I had not included it because I could not find the piece and assumed it had been misplaced in the big move from Atlanta to the north Georgia mountains. He informed me that I had loaned it to him after he was admiring the simple construction involved in converting an incomplete plane and a five dollar flea market Stanley 80 into a neat scraper plane. Looking for an excuse to get out of the dirty air and heavy Atlanta traffic he offered to drive it up and buy my lunch ....what a deal. After lunch we sharpened the blade and made a few shavings with the scraper plane and it was then I recalled the excitement I felt when first using the tool.
 When I made this tool I had two or three Stanley 80 scrapers in the shop . I was building pool tables at that time and was using the Stanley 80 to scrape down the mother of pearl inlaid diamonds on the rosewood rails. I had only tried a Stanley112 scraper once and the feel of a fixed scraper blade installed in a plane body that had a handle and front knob provided a level of control I liked better than a spokeshave or rams head handle configuration. I decided to fabricate a poor mans 85 using an old Stanley #3 body and an extra Stanley 80.
The first step was to take one of the extra Stanley 80's and perform a lobotomy on the center of the casting.Cutting cast iron with a new hacksaw blade was relative easy. I made the initial cuts wide and dressed up the removed section on a belt sander. Next I drilled and elongated the two holes for the frog screws. An 1/8 inch thick piece of flat brass stock was used to secure the blade similar to the bar on the Stanley 80.
 The blade was shaped like the blade on the 85 to accommodate the frog retaining bar but extend the width of the blade to the sides of the plane body.
 By cutting out the center section of the Stanley 80 the adjusting screw would still be available for bowing the blade with the blade centered in the throat opening. More on this later.
 The new frog that would hold the scraper blade would not extend forward enough to use the existing "original"throat. This required cutting a new throat into the plane body to receive the scraper blade. After careful measurement I scribed a line across the bottom of the plane where I wanted the blade to extend through the bed. After scribing a line I drilled several 1/8 inch holes across the scribed line and using a coping saw and file cleaned the new throat opening. The new throat was made to extend across the width of the bed to achieve the dado effect.
 The Stanley 85 and 87 scraper planes were unique in the way the blade was installed in the throat opening. But first let's back up a minute and discuss the blade that was used in the original Stanley 85/87 scraper planes. Because this plane was made to be a light weight "finesse scraper" the stock blade thickness was around .030 , much thinner than the stock blades for the 12--112-- 212 series of scrapers.
The blade was installed with the blade touching the front of the throat opening. With the blade set to provide a light scraping action, once the blade was locked there was a small screw located to the rear and centered between the two frog retaining screws, this screw was adjusted to provide a small pivot of the frog which would increase or decrease the depth of cut.
On My fabricated scraper I decided not to install this fine pitch adjusting screw because I had the thumbscrew from the original Stanley 80 as part of my frog.
With the blade set against the front of the throat as you would push the body forward to take a cut the burr would start its cutting and the forward pressure working against the cutting action would cause the thin blade to bow thus providing an opening for the shavings to escape. This prevented shavings from falling through the throat opening and becoming victims of "shaving road kill".
Once one becomes proficient at setting the blade against the front of the throat and feeling the blade bite and spring back you can back the blade away from the throat and position it in the middle of the throat opening. With the blade set in the center the scraper will still perform but not as "sweet" as set the way the scraper was intended to operate. The blade can also be backed against the rear of the throat , in this position the cutting action becomes very rigid with increased blade chatter.It's like swapping your nice springy leaf rake for a short toothed garden rake.
 Showing blade set for best "finesse" scraping feel and results.
 With the fabricated version I did not include the fine tilt adjusting setscrew but could regulate the cutting depth by turning the bow thumbscrew as done with a Stanley 80. Overall the conversion made a very usable scraper and it quickly became my favorite for scraping down the mother of pearl inlays flush with the rail wood on the pool tables.
 Regardless of the type of scraper plane one uses if the blade is not properly prepared and sharpened you will easily become frustrated and not become proficient in making the tool talk to you. If you have mastered the blade sharpening and installation you know what I am speaking of when I say "talk to you". In a later post I will try and share my experiences on preparing and sharpening a scraper blade for use in a scraper plane. There have been numerous articles written on sharpening card scrapers but maybe the woodworking community could stand one more as it relates to scraper blades used in scraper planes.


No comments:
Post a Comment